Pages

Monday, February 24, 2014

How to build a Folding Stick Chair

Draft
This chair is a fairly simple build, although it does take a fair amount of time to cut the parts and drill the holes in all of them, but after thats done its pretty simple.  The design sparked my interest and I figured I would make one or two of them, Im glad I did, they turned out great!

IMG of Chair

There are plans for this chair in a few places online, some will cost you some will be free but are difficult to understand or navigate through due to ads and whatnot.  I hope to provide you with a straight forward and easy to follow how to guide!

Have a look at my short video to get the what all the project entails and understand how everything works.  You will find the details and dimensions of the pieces below the video.


All of the pieces are cut out of 2x4 stock, they are all 1 1/4" x 1 1/2".
All holes are drilled on the wider 1 1/2" side of each piece and also centered across the piece.


1930s VANITY TURNED INTO FRENCH NIGHTSTANDS

 
Two little drawered units were lovingly donation just before the holidays.
Thank you again to the Donator!


"See the side panel on this one ..."
 
This use to be a 1930s dressing vanity that was divided into two.

 
I was able to add some costly additions such as these tall hardwood legs and 4 matching
pieces of antique hardware. The little swing handles have a really nice patina.
They mount with tiny screws through the front. In this case I predrilled first because there is
never room for error when installing tiny antique brass flat head screws.


It seems like there a thousands of these stepped topped art deco vanity desks out there.
It also seems like there are even less people who like them, me included.
I started a PINTEREST page devoted to finding great looking up cycled 1930s vanities
so some of them can be saved.
http://www.pinterest.com/firstfindsgg/1930s-vanity/pins/


I STOPPED TO SMELL THE FLOWERS sweet nothings


While meandering the pathways and enjoying our day at the Fieldstone Market
these cute little arrangements caught my eye.


The creator of these little gems Julie of Sweet Nothings
explained the tea cup arrangements were in floral foam and guaranteed to last for
minimum a week and hopefully longer.


George and Julie started talking flowers (business)
while I was busy trying to decide which ones I was going to get.


The arrangement I picked got comments all around the market as we kept shopping.


and I would direct them straight back to Julies booth.


These delightful orange rose arrangements would have been my first choice,
but I didnt see these at first but at least glad I got a photo of them. 


I think my first choice ended up working out perfectly.

For those looking for new furniture pieces
I do have a Vilas small space table and single white night stand
newly listed on the AVAILABLE page


FIXING A BROKEN DRAWER tutorial

 
Okay ladies this one is for you.
 
 
A common issues with old drawers is broken bottoms and stains in the wood.
 
Im going to show you how to fix both issues with one repair.
 
 
We need to fill in this gap with a new piece of wood but the break part doesnt have a straight edge,
this makes things a bit difficult. 
 
 
But wait ... we do have a straight edge at the front of the drawer. 
 
 
Most drawers even modern ones are built with the bottoms slid into place in a groove.
Slide your broken board completely out of the groove, some nails may have to be removed. 
 
 
 This next step is probably the hardest part of the job,
you need to find a new piece of wood that is the same thickness as your existing bottom.
You could always replace the whole bottom by taking a trip to your local lumber store with
measurements in hand and get them to do the work for you.
 
 
 Im showing you how to use what you have and just fill in the gap.
The wood I found and used is a 1/4" thick scrap of plywood.
 
 
Cut the length of the new board to fit into the grove and slide it into place.
You can use a hand saw, a jigsaw, a circular saw, or even a pretty please husband!!


Remember that stain in your drawer ....
 Take your stained drawer bottom and flip it over and slide it in to the grove.
 
 
Your stain is now on the bottom and your gap is gone.
 
 
Add a few nails at the back of the drawer to hold your bottom in place.


There you go ... a functional clean drawer that hopefully cost you nothing but a bit of digging
through your shed or garage.
 

Sunday, February 23, 2014

The New Shop! Pt 1

I am loading up my shop and moving it to a new home! Well, not yet, but I am getting close!

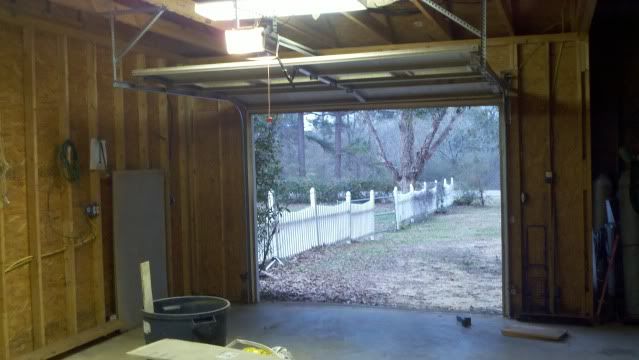
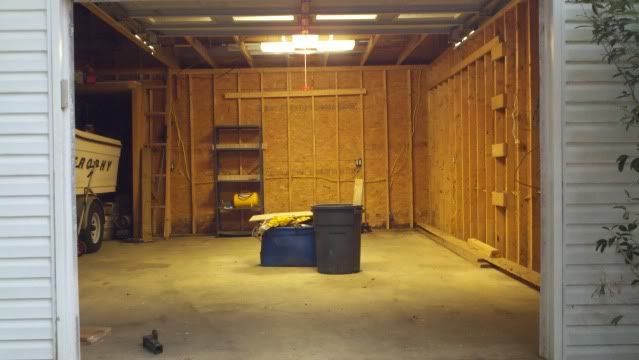
I have decided to move my shop to my home, since I have had a break-in and having a shop at home would be so nice (having to drive 20 minutes to my shop makes me spend less time there). The plan is to moving into a bay of our "boat barn", it is a larger garage if you will that is approximately 30x60 and has a two boats, fourwheelers, a golf cart and a bunch of my step fathers junk, yes, most of it is junk. Sadly I couldnt convince him to give me the whole thing, so I settled with one bay of it a 13.5x25 section.


As you can see, it is pretty full. Most of the barn is this way, I think my stepdad is a mild hoarder..... alot of the stuff is... well I wont go there. I got him in there with me Sunday afternoon and consolidated all of the things into the other parts of the barn. Our agreement was that I could get 100% of his stuff out of that bay and have only my things over there. It took us probably a good hour to move it all, when we were done it was looking good.


My plans are to close it off completely from the rest of the barn with a nice wall. I want to insulate it, hang 1/2" plywood all along the walls, paint it white, then move all my tools in and build something! More to come!

Feel free to "Follow" along with me, this should be exciting! Look in the right column for "followers" and click follow.

VERDIGRIS MIRRORS how to


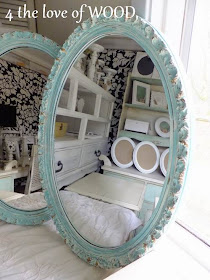
I painted some vintage oval mirrors in a turquoise verdigris look awhile back
and have not got around to sharing the technics I used, until now.


Verdigris is the common name for the natural green patina
formed when copper, brass or bronze is weathered
and exposed to air or seawater over a period of time.
 
 
This technic works for mirrors that were originally gold.
The gold color is going to take place of your copper, brass or bronze.
 
 
I originally painted the gold frames in a latex white and they sat around long enough to fully cure
(1 month), this is going to be a tough layer of paint to work with.
 
 
I painted the turquoise over the white latex.
My turquoise was a mix of Annie Sloan Chalk Paint in Florence and white mixed to tone it down.
I scrubbed back the turquoise to expose the white with a kitchen sponge
and I use a razor blade to scrape back the white exposing the gold.
The oxidation process is rather rough and unpredictable and using
the different paints helped achieve the look.
 
 
Have A Great Weekend!!!


A TALE OF TWO TABLES elinors tables


What do you do if you have a beautiful hand crafted dining table and no room for it
in the dining room.


Now this table is fairly large at 42" wide and 50" long.


Well Elinor asked me to make her two bedside tables,
as she does have the room for large fancy legged tables in her bedroom.

Lucky Girl!


She wanted one to be a desk type of table, 
and the other to have a bottom shelf.
I used one leaf and an off cut from the top to make the shelf.


I ended up trimming the front of the shelf with pieces of wood I had in my collection but
everything else that was used to build these tables are from the original piece.

Elinor will be painting her new tables and if we keep our fingers crossed and beg ever so
slightly she might send us photos when they are done.


P.S. The lilacs are in bloom and if Elinor picks up soon she might even get a bouquet for her birthday.

Sharing with:

Miss Mustard Seeds Creative Blog

THE LIONS DESK my desk


My new desk started with several broken or missing legs when I bought it.
I was able to removed what was there and repaired
what I could and these legs will be used for another project.


Ive had a set of amazing antique claw feet waiting for just the right project,
(you can see them below)
what better project than my own shabby chic curvy white desk.


The desk wasnt a priority to work on as I had other furniture to get finished.
But then out of the blue I had a complete day of no creativity.
My Mojo was just gone!
It was unnerving, unsettling, and can you imagine how hard it was for George to be around me!
And what I mean is not a lazy day watching movies, I mean 0 creative ability yet tonnes of mess made.


Fortunately the next morning I was running full speed and created something unexpected.


I started working on this poor vanity piece that had its legs cut short.
The pictures are deceiving, it is only 22 inches high.
I built a shelf display to add to the top with the intent it would be another great kitchen piece.

It looked good but I found there was a disconnect between the 2 pieces in style.
I white washed the back boards just before bring it in because of an impending rain storm. 


The only available place to put it while it was inside was on the new desk I was waxing.
In that moment we both stood back and agreed they belong together, and we were keeping it.


My new desk has been added to our home tour page,
under BLOGGING HEADQUARTERS

Sharing with:


Primitive and ProperFurniture Feature Fridays