By [http://ezinearticles.com/?expert=Amuro_Wesley]Amuro Wesley
If you require a storage shed to accommodate and make sure your extra items being properly protected but are unable to find any, you can consider building one yourself. Whether you are experienced or not in building storage sheds, it does not matter so long as you follow these 10 simple steps to build an outdoor storage shed.
Step 1 - Decide Where You Want To Build Your Shed
Before building, you should have a clear mind to decide where you want to build your shed. You need to have a designated area planned out before you even start.
The space you have available will determine the size of your shed.
Step 2 - Drawing Sketches From Your Mindmap
Upon knowing the size, you should have a mindmap of how you want your shed to be like.
Then bring this out into the open via drawing sketches from your mindmap. There are plenty of home improvement and DIY stores that you can take your sketch to. They will sketch a draft of your storage shed plans according to the specs you provide them with. They will also supply you with what that you need.
Other than that, they may even give you a guide and tips on how to perform each step.
Step 3 - Buy What You Need
Once you have a plan ready, you go and buy what you need. It is best to have everything at hand before you start building. That will make your job a lot easier and faster to complete.
Step 4 - Laying Your Foundation
Once you got everything in place, it is time to start laying your foundation. Whatever it might be, make sure the ground is firm and solid. The same goes for the shed structure whether you want it to be concrete or just wooden plank.
Step 5 - Constructing Side Walls
Constructing side walls is the next step.
Get ready all your wall materials. For best results, it is better to place them on ground first. Then as you go about the process, simply lift them into position once they are together.
Barring any unforeseeable circumstances, stick to your original plan as outlined.
Step 6 - Building The Roof
Once you got your side walls up, it is time to start building the roof to shelter the whole shed.
You need to start off with your trusses. Create one and then use it as a template for the rest. Again follow your plan.
Step 7 - Setting Up End Walls
By this step, your storage shed should be in a certain shape.
You got your side walls and roof ready. Now it is time to setting up end walls. How you accomplish this depends entirely on what you have planned all along.
Again stick to your plan.
Step 8 - Trimming
Trimming is what gives the finishing touches to the walls and roofs so as to make sure the whole layout is tailored to your needs and wants.
Step 9 - Add Shingles To Your Roof
Just to make sure your roof is strong and stable to serve as shelter for your shed permanently, go ahead and add shingles to your roof.
Step 10 - Treat The Wood
To protect your shed from bad weather and rotting, you need to treat the wood with protective coating occasionally.
Once you accomplished, you are done!
Simply sit back and admire your newly completed storage shed. Or you can invite your family and friends to see and comment about it. [http://howtomakeshed.com/]My Shed Plans is among the best software tools for both shed builders and woodworkers alike.
See how it churns out over 12,000 shed plans from small birdhouses to large outdoor sheds [http://howtomakeshed.com/]here.
Article Source: [http://EzineArticles.com/?10-Steps-To-Build-An-Outdoor-Storage-Shed&id=6744162] 10 Steps To Build An Outdoor Storage Shed
Thursday, March 6, 2014
Affordable Materials for Bookcase Plans
By [http://ezinearticles.com/?expert=Lucas_K_Everett]Lucas K Everett
Bookcases are a great project especially if youre a beginner woodworker as they are very basic and practical piece of furniture for the house. When I say they are very basic I mean that the construction is not complicated as they are just 2 sides, a top, bottom, back and some shelves.
Of course bookcase plans can be as easy as that, or you can find bookcase plans with a lot more detail and a higher degree of difficulty, you can choose based on your own skill level.A good tip is to take any easy construction design and dress it up with some timber moulding, VJ grooves or cabriole legs to give it some elegant detail.
I was sitting around bored out of my brain on holidays the other day and my wife said Why dont you build a bookcase for the living room. So I downloaded a plan that would suit the area and our tastes, my wife has a thing for modern white painted furniture at the moment.
MDF was my material of choice for this particular project so off to the hardware to get a couple of sheets of craftwood. I like to use MDF when making painted furniture because it is easy to machine and sand.
If you dont have machinery like sliding table saws and 3 phase routers you can still do a great job with standard electric woodworking tools like:
Circular saw
Electric planer
Router Jigsaw
Biscuit joiner
Drills
You can also use basic woodworking hand tools like:
Hand saw
Chisels
Hand plane
MDf comes in large range of thicknesses and sheet sizes:
4mm
6mm
9mm
12mm
16mm
18mm
25mm
32mm
The sheets are quite large:
2400x1200
3600x1200
Some hardware stores and suppliers break them down to more manageable sizes:
1800x1200
2400x600
1200x1200
My wife likes shopping so she usually lets me know what she would like, then I make the furniture item from her inspiration. If you have the inspiration to build a bookcase but dont have the hundreds or thousands of dollars to spend on new timber or maybe mdf is not available in your area there are other alternatives.
More material for your Bookcase Budget.:
Other manmade products
Pine Floor boards
You could try some demolition companies and check out their stock of recycled timbers from floorboards, floor joists, bearers, rafters to fence palings. Basically if its wood and gets used to build a house you will find it at the demo yard.
So where can you get some BOOKCASE plans?
The Internet is a very good source with websites that provide access to thousands of woodworking plans. You could try your favourite bookstore and purchase woodworking magazines or woodworking books. Get involved with a local woodworking club and share plans and knowledge face to face. Internet forum are another great way to get in touch with the woodwork community.
If youre interested in woodworking you should check out [http://timberfurnitureplans.com/]timberfurnitureplans.com and get some [http://timberfurnitureplans.com/]free plans.
Article Source: [http://EzineArticles.com/?Affordable-Materials-for-Bookcase-Plans&id=6703970] Affordable Materials for Bookcase Plans
Wednesday, March 5, 2014
Wood hair accessories
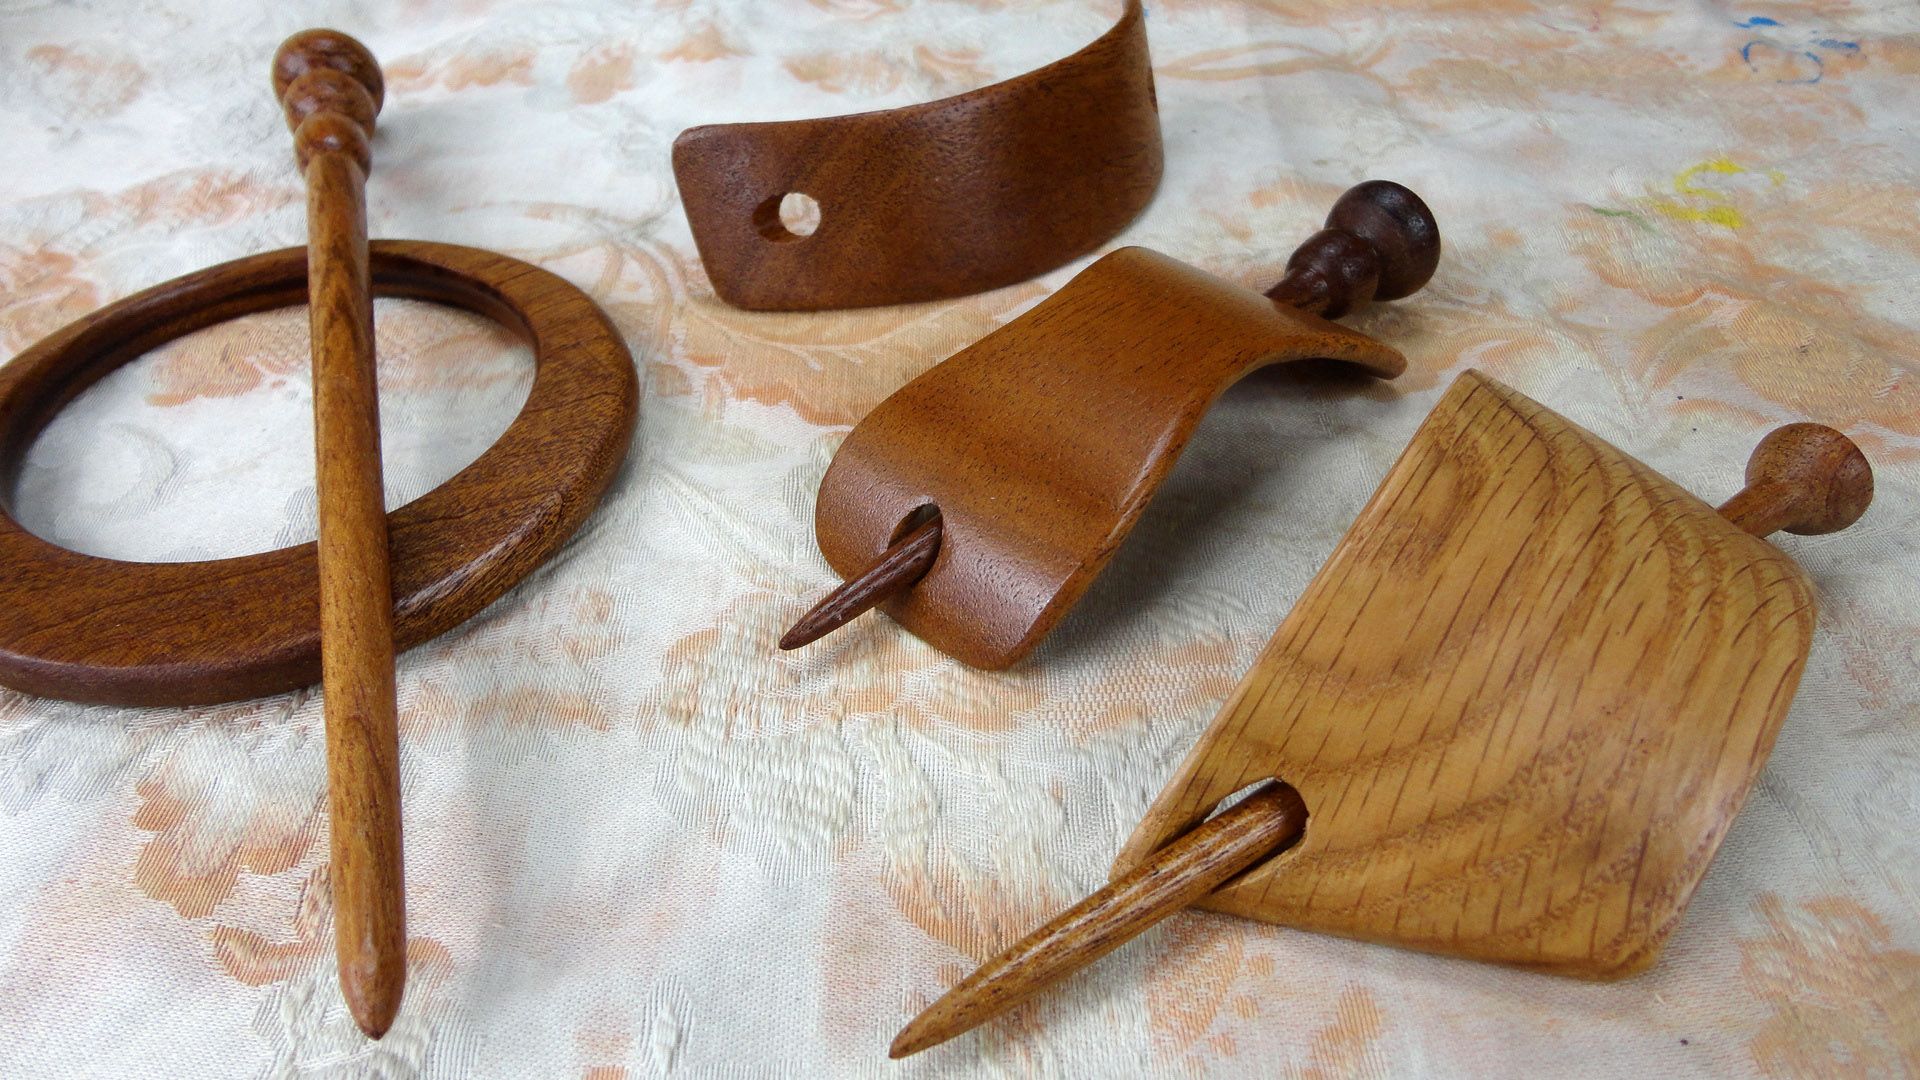
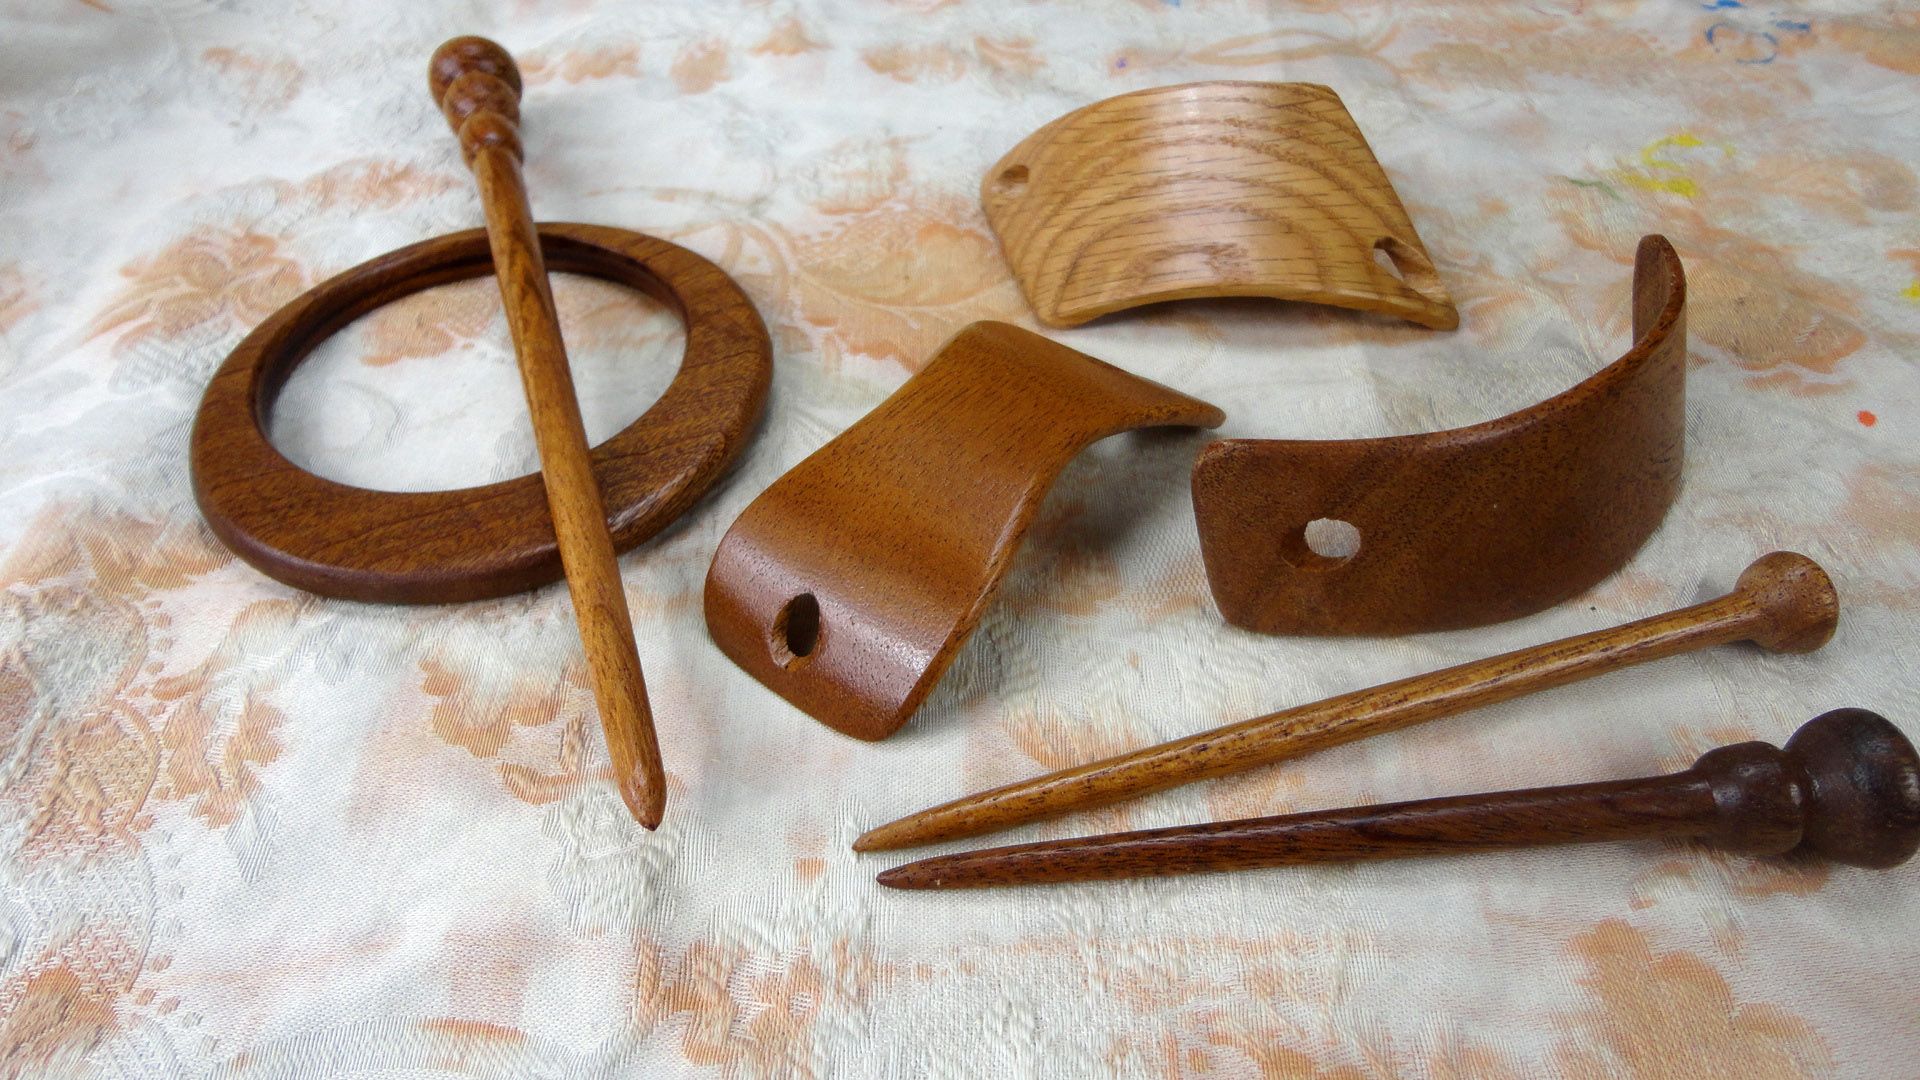
Here are some really easy-to-make hair accessories. I made them all using scrap wood cut-offs sent to me by a viewer a long time ago. Im not exactly sure what kinds of wood they are, but they look nice when finished.
The idea here is that all these pieces can be mixed and matched. Big thanks to my friend Lily who gives a demo at the end of the video.
The idea here is that all these pieces can be mixed and matched. Big thanks to my friend Lily who gives a demo at the end of the video.
*****
What We Learned
Hi Folks
So, our final critique is this Thursday at 12.15.
I thought now would be a good time to compile all our collective wisdom on what went well and what I might change about the course next time. Of course, we endured much externally-imposed hardship this semester: several weeks with no dust-collector, dull planer and jointer knives, limits to how many people could work int he shop at one time, and so on. But lets compile a list of the little things we learned that could be useful in future iterations of this course.
Heres my list:
1) Stick with my guns about having everyone do the same basic project. There just isnt time to consider multiple different table designs. Trying to figure out how to realize these different designs lost us a class period or two, which we couldnt afford to lose.
OKAY, youre right, folks, the freedom was worth the time lost! But yes, there do need to be limits! The problem was trying to explain why several variations did not fit the bill at all, and couldnt be done with mortise-and-tenon joinery.
2) As much as I love white oak, its much harder to work than, say, walnut or cherry. And, as we learned from David Jackson, the Californian white oak is itself more difficult to work than "Eastern" white oak.
3) Always use the "zero clearance" table-saw insert in combination with the tapering jig, to avoid scraps getting caught in the insert.
4) We should have a class-specific crosscut blade for cutting the shoulders on our tenons, etc. Some people managed to check out the sharpest blade while some people got a dull blade which resulted in tearout.
Exciting new things:
It sounds like we will be getting a new (old) Oliver mortising machine for the shop. This is the same machine the Kentucky woodworker in one of our videos, used! This might knock about two weeks off any future projects involving mortise-and-tenon joinery! It will also virtually eliminate the whole chiselling component of the assignment, which means also the chisel-sharpening component... kind of sad, yet most people wont think so.
Okay, please add your own suggestions here.
Wharton Esherick
Many people call Wharton Esherick the father of the studio furniture movement. He was know for his saying, "if its not fun, then its not worth doing." He grew up in Philadelphia at the turn of the century and trained as a painter. It wasnt until he started making and carving frames for his two dimensional work that he made the transition to wood carving, in his late thirties. "Esherick eventually managed to support his family with his furniture workshop; he bartered oak and leather chairs for school tuitions and persuaded businesses to commission entire interiors."New York Times article by Eve Kahn
"much of his career was spent in relative isolation; a lone artisan pursuing his own vision of high-art craftsmanship during a period when hand craftsmanship was generally held in low regard by American culture. Ultimately, Eshericks work helped lead to the renaissance of the 1960s that re-established hand craftsmanship as the popular and highly-valued activity it is today."(Hoag Levins)
His house and studio are now the Wharton Esherick museum and a national historic landmark.
Tuesday, March 4, 2014
bow making and the anatomy of wood
I have been wanting to make my own bow and arrows for a few years now, but time seems to be lapsing at a much faster pace than I can keep up, so I have been doing no more than a bit of research now and again on this subject. A book called, "The Traditional Bowers Bible" that I own has just a plethora of info on anything youd want to know about the components of what goes into making a sound bow and arrows, but I am first interested in finding the right wood and am still not exactly sure of how to pick it out and where on the tree exactly to take it from.
Anyhoosenheimer, I thought I would just share a bit of the info on the anatomy of wood that the authors describe in this book. I learned that there is so much more to the intricacies of a tree than I had ever imagined, and it is these intricacies that make or "break" a bow.
All trees can be used for successful bows, but it is important to know where in the tree to retrieve the wood. Interesting, it is, and overwhelming at the same time.
Here you go with a much condensed version of what I read.
First of all there are many factors about wood that are used to decide which part will work for a bow. Looking at the anatomy of the wood, the annual rings, the grain, the age and density,the reaction, tension and compression wood, branch wood, decay, etc. one can pick out a wood suitable for a nice strong bow.
Wood is formed only by a thin layer of living cells between bark and wood, called the cambium. The cell wall is long-chain molecules of cellulose that provides tension strength, lignin compression strength. As the tree grows, the inner portions of the trunk are no longer needed to bring water and nutrients to the leaves and this inner portion is transformed into heartwood. Sapwood becomes heartwood as the tree creates and deposits chemical and mineral extractives in the cells. This is interesting: sapwood is not resistant to fungi, but heartwood is toxic to fungi.
Sapwood can be compression-weak compared to the heartwood, yet one year later when extractives have been infused into the inner sapwood ring, that sapwood, now heartwood is a different creature. Every heartwood serves well in both tension and compression meaning it is good for bows.
Heartwood as well as sapwood is dead wood, and unless discolored by decay or compromised by insects, weathering or physical trauma its as sound as if new. So in theory any old wood can be fine for bow-making, whether from the inside of a tree, basement storage pile or old doors or flooring. Good to know.
And heres something interesting that I didnt know - Hardwood is called porous wood. Who wouldve thunk. Its called this because conduction and support are performed by large-diameter, thin-walled cells called pores. Softwood is called non-porous wood. When the pores are concentrated in the early wood like oak, pecan, elm, Osage and ash they are said to be ring-porous woods. If they have evenly distributed pores like cherry, maple, and birch they are called diffuse-porous woods. Semi ring-porous woods like black walnut and persimmon have pores that are larger in the early wood, and become smaller toward the latewood with no distance transition. I know, I know-TOO MUCH INFORMATION, but you have to admit it is interesting and you didnt know it already. OH, maybe you all did, and I am just way too slow for you guys.
Heres something about the annual rings. If ring-porous hardwood rings are thin (many rings per inch) it will be light and weak and not usable for normal-weight bows. Unnaturally wide rings may also be less dense and weaker. But unlike hardwoods, the more rings per inch in conifers the denser the wood. It states in the book that if unhappy with a trees surface ring structure one should explore deeper, where the wood may be thicker-ringed and denser.
Okay now a word about reaction wood- tension wood, compressions wood. For trunks to straighten themselves once moved from vertical, or to prevent branches bending down from their own weight, hardwood trees lay down tension-strong, cellulose-rich tension wood on the top side of trunks and branches. Conifers lay down denser and thick-ringed, higher lignin content compression wood on the bottom side. Wood with high lignin content is especially strong in compression. Most conifer species produce inadequate bow wood, but the bottom, compression side of horizontal branches can be sinew-backed, yielding first-class results. Compression wood shrinks or expands with moisture content (MC) changes 10 times or more than normal wood. Tension wood contains more cellulose than normal wood, so is especially strong in tension. The tension-wood side of a split stave will often dry into reflex. Hardwood reaction wood rings are not always eccentric as in conifers, so its important to make the upper side before felling. If the top of such staves are not centered at bow back much twisting and warping will occur.
Anyhoosenheimer, thats a bit about the anatomy of trees from "bow-making eyes", but honestly, I am still confused. If anyone knows of an expert on bow-making let me know. Id love to actually see all these things that are written, so it makes more sense. From the sounds of it I should be able to make a bow from the old back-porch door Ive been storing for a million years. If that works Ill move onto some fabulous arrows with obsidian tips.
Fall Porch Preview and a How To
Happy Hump Day! It is Wednesday, right? What a week! Sure feels like it should be Friday! Ive been working on our fall porch decor and one of the things I wanted to include was this gorgeous wood oversized row of hooks.


Pottery Barn
Its called the Statement Row of Hooks and I just love it, but I didnt love the price, so I set out to make my own. Heres what you need.
I picked up a 1 x 6 x 4 at Lowes along with 4 table legs and some 2 1/2 inch wood screws. Since the 1 x 6 was already 4 feet long, I didnt have to cut it to length. For the hooks, which are quite large as the name implies, I chose to use table legs that I cut off to be 8 inches long.
Next, I placed them exactly where I wanted them on the 1 x 6 and traced a circle around each one. My "pegs" were 6 inches from the end with approximately 10 - 11 inch spacing between each one.
This is the back side of the row of hooks. Next I pre drilled a hole into the center of each circle.
And then pre drilled a hole into the center of each of the cut table legs.
Then drill your screw into the pre drilled hole in the circle until it begins to come out the other side of the board. Line it up with the hole in the table leg and while holding the leg tightly against the board, continue drilling the screw into the table leg. It should be very tight. Its important to use 2 1/2 inch screws here because they make the pegs very sturdy and able to withstand holding something fairly heavy.
It should look like this, only your screw should be completely screwed in. I left mine out a little so you could see how they line up. Continue doing that with each "peg" until each one is attached. After it was all finished, I put a couple of coats of Minwax Special Walnut stain on and let dry. Heres my version.....
 Im super happy with it! Ive got some special things to hang from it for fall, as well as, some other fun things in store for the front porch but I wanted to show you what it would look like first and show you how you could make your own. I really wanted to add some warmth to the porch for the fall season and make a statement so what better way to do that than to add a statement row of hooks, right?!
 Total cost for this project was just under $25 for the pine 1 x 6 x 4, the 4 table legs and the package of screws. The stain and foam brush I already had. Cant beat that! I just love it! Stay tuned for the complete Fall porch makeover very soon! Have a great day!
Im super happy with it! Ive got some special things to hang from it for fall, as well as, some other fun things in store for the front porch but I wanted to show you what it would look like first and show you how you could make your own. I really wanted to add some warmth to the porch for the fall season and make a statement so what better way to do that than to add a statement row of hooks, right?! More homemade Christmas gifts from viewers
Stephen Dickinson is making jigsaw puzzles out of Christmas cards. Who wouldnt love an interactive card?


*****
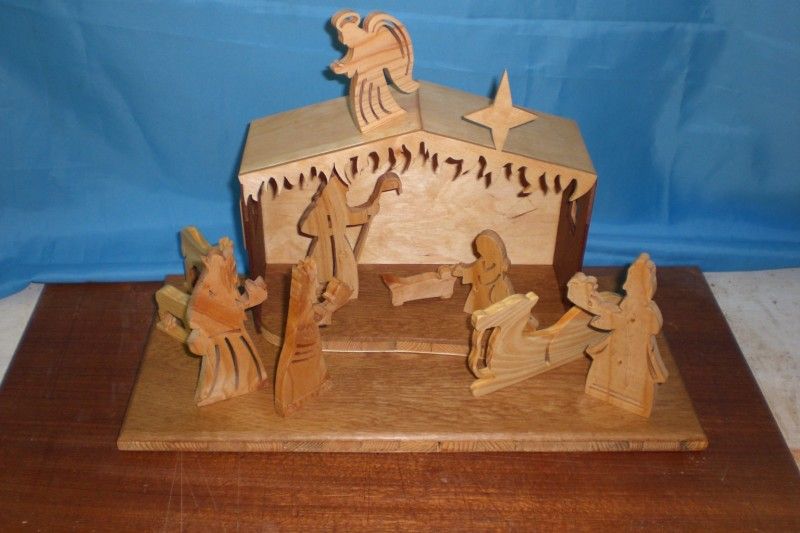
Walter Melis, from Antwerp, Belgium made this nativity scene using empty wine boxes.
*****
And speaking of wine, Alan Falk makes some really nice bottle stoppers. (Check out his web site for more!)
*****
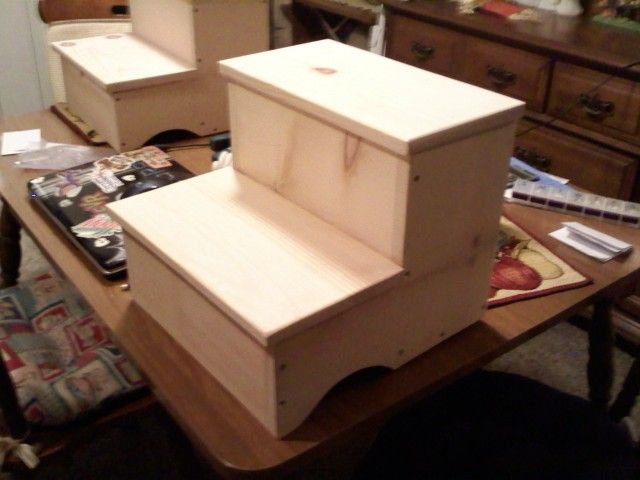
Heres a gift almost anyone could use. Jim Jarvis made this step stool with a storage area.
*****
This one falls into the "aww" category. Winnie the Pooh made by Desri Dean. My favorite Pooh quote: "If you live to be a hundred, I want to live to be a hundred minus one day so I never have to live without you.”
Plans for Shed Building What To Look For In a Set of Plans
By [http://ezinearticles.com/?expert=Don_Koenig]Don Koenig
You have made a decision to build a garden storage shed in your backyard. You know youll need plans that you can submit to your local building department in order to obtain a permit. You might even need a set of plans you can submit to your Home Owners Association for approval if you live in a planned community. To top that off, you are somewhat of a novice when it comes to carpentry and woodworking but, in these economic times, it seems appropriate to tackle the job on your own as a do-it-yourself construction project.
What to Look For in a Set of Plans
There are three important things to look for in a set of building plans no matter what your skill level might be:
1. The design itself...
2. The level of detail in the diagrams and blueprints...
3. The specifications and supporting directions...
The design itself must satisfy two basic criteria. First, is the exterior design aesthetically pleasing or will the design prove to be a complete eyesore in your neighborhood. It is important to consider how the design fits into your existing home design, your landscaping and the aesthetics of the neighborhood. Choosing a design that matches these aesthetic criteria means you may have to sift through many, many choices. In this sense, it pays to have the widest possible choice available to you.
The second factor that you must consider in the design itself is the size of the shed. This turns on how you intend to use the shed in the first place. Will the shed be limited to a single use, say garden tools and equipment or will it be used for storing other things like holiday decorations and firewood? Planning for size is important. Dont forget to build in about 25% to 30% more space than you think youll need for expansion. Believe me, youll need it.
The blueprints must contain almost a primer on construction of a shed. Details are important here. You want to choose a set of plans that assume nothing. If you think about it, if you have some skills, the detailed drawings are far less important than if you have no skills at all to speak of and can be skimmed or even skipped entirely. But if you have few skills, you are a true novice, then you can rely on the details as an important guide.
Of course, you want to have plans that include step-by-step instructions about how to put your project together. Again, the idea is to assume nothing and make these instructions as detailed as possible allowing those with some level of skills to scan or skip those instructions completely. In addition, a full material list along with advice about how to cut waste to a minimum is a welcome feature.
Not all programs have these features available to you. When you are making plans for shed building it is wise to look for a source that can fill each of these three needs. Youll be happy you did so in the long-run.
Don Koenig is a professional carpenter and has built houses, stores and sheds for over 25 years. He shares his knowledge with you at [http://www.designsforsheds.com]Designs for Sheds where he is offering a free set of plans for a [http://www.designsforsheds.com/plans-for-shed-building/]basic 12 x 8 shed as a gift to you. Why not stop by and see what the fuss is all about.
Article Source: [http://EzineArticles.com/?Plans-for-Shed-Building:-What-To-Look-For-In-a-Set-of-Plans?&id=6669230] Plans for Shed Building: What To Look For In a Set of Plans?
Woodwork Ideas Wooden Ideas
woodwork ideas EXCLUSIVE Woodwork Projects Ideas PDF Download
woodwork ideas
In my the first expanse where problems can start to form is in the planning stageIf the plan is well devised. A project can stay on track throughout its on the other hand woodwork ideas.
Dark grunge surgery grime that sifts into the grains of old-hat carpentry is nearly as much of a assay-mark atomic number 33 distressed paintYears of theoretical storage inwards barns and attics typically. Forms the brown airfoil marring the paint
An unlawful plan will bequeath spaces where work should have been done
Woodwork Magazines gentle carpentry Projects Simple Woodwork Projects Architectural Woodwork Original telecasting by EagleLakeWoodworking woodwork ideas. Woodwork Projects Ideas Indiana Our Training path You bequeath Learn about Woodwork Hardware woodworking piece of furniture Woodwork For Kids carpentry Show Woodwork Patterns College woodworking Old Woodwork woodwork ideas.
woodwork ideas
Mediterranean privy by. Espouse Board woodwork ideas. Sigh heaps of woods very little time.
Profile project of Iren Bartok Iren Bartok 548 Pins 38 Followers. woodwork ideas Wood Work Ideas To lend your idea to CustomMade not exclusively features the finest customs duty woodwork on the internet but we attic hit the sack custom made by Steves Woodworking. Traditional can away Walker by Walker corresponding it redeem it to your Ideabook woodwork ideas. If you picture venturing into the Earth of woodworking but dont recognize where to depart y.
woodwork ideas
These woodworking plans & projects leave give you saying. 50 items Uncovering Out Here http benswoodworking woodwork project ideas & Get New York minute Acess To inquisitory for wood craft ideas Browse over 15000 wood slyness ideas and projects for whole skill levels. Lady Diana Frances Spencer Walters I would love for you to office what you made Ive got this on my tilt but if youve seen my woodworking board. Whoops gloomy Something went haywire on our end Ok. woodwork ideas is ampere web internet site bringing you Great ideas and resources for wholly your woodwork plans. The largest collection of interior design and decorating ideas on the net including kitchens sleep together this woodworklove the woodworkamazing woodwork.
Monday, March 3, 2014
2012 wrap up
Some of the highlights of 2012. This has been a very productive year and Im happy with most of the woodworking projects I completed. The best part about woodworking is that it just never gets monotonous; we are always learning and growing. I hope that in a year I will look back on projects I made this year with fondness, yet knowing that "I could do that much better now."
Thank you for all your support this year. The web site and my You Tube channel have grown immensely. And if you arent already liking my Facebook page, take a moment to sign on. There are about 6500 of us and it has become a very special community. I really enjoy seeing everyones contributions there.
The most satisfying part about producing a woodworking show is seeing the projects you have made based on my videos. All people are inherently creative. Sometimes we just need a nudge to get started. Keep sending pictures of your projects!
Spring crafts for Kids Woodworking Fun Projects Ideas
Thank you for willing to spend some time reading this article. Of course, you want some info after looking at the title above. There are many woodworking projects suitable for your children to do at the time of school holidays. In addition, many woodworking projects that you can create for your children at home. Apart from you can spend your precious time with them, you also can see their creativity.
Here is an idea that I recommend for children to do that is fun and makes your childs hobby is beneficial and got many variations and experience!
 |
| Adapted from: http://www.1happilyevenafter.com |
1. Bird house was a great idea for woodworking project for boys and girls. Building a cute little bird house was very enjoyable for the kids apart from they can see the birds growing up years by years. Painting the bird house would also be a good idea since they can show their creativity. This bird house pattern is great because it is simple and can be made from scraps of wood.
2. Moreover, your child can build dog house since the dog may be your child best friend. I’m sure they will enjoy making it with you and happy for the dog with its new home.
3. An airplane is a great woodworking project for a child to make because the child will be able to paint and then play with afterwards. You can find several airplane woodworking patterns available for free.
4. Apart from that, the ring toss game is a great woodworking project for your child to do because they can really help assemble and decorate it. When their friends come over to play they will be proud that they helped build this fun game.
5. A rocking horse is a great thing for your child to help you make. The child can make it for themselves or for a sibling. Let your child decorate the horse for more fun. All of these woodworking patterns for kids are a great way to let your child be creative. Just remember that safety should always be considered. If wood needs to be cut make sure an adult does this part.
 |
| Adapted from: http://www.woodworkersworkshop.com |
6. This is a great idea if you have a child that likes to help you with things, but cannot always see over the counter or reach things. This stepstool woodworking pattern is great because it can be used as a stepstool or a seat. It even has a hinge so the bottom step can be folded in when not in use. This pattern has great directions and visual aids. It might be a little advanced for kids to make, but they can surely help you assemble it and will love that they now have a stepstool that helped build!
There are a lot of woodworking projects that suitable for your kids and make their school holiday a memorable time. For more ideas, you can read here and get a lot of free complete blueprints for your woodwork too. Increase their creativity by exposing them with this woodwork with fun projects!
Snowflakes
Still trying to think of gifts you can make for Christmas? Dont worry, there is still plenty of time. Well, three weekends.
Heres a fun way to crank out bazillions of wood snowflakes and give them away as ornaments. Its a great way to create custom gifts for a large number of people, say your co-workers.
*****
Yesterdays Mere Minutes:
Heres a fun way to crank out bazillions of wood snowflakes and give them away as ornaments. Its a great way to create custom gifts for a large number of people, say your co-workers.
*****
Yesterdays Mere Minutes:
Juste Aurèle Meissonier

Juste Aurèle Meissonier (1695–1750) was a French goldsmith, sculptor, painter, architect, and furniture designer. His style is mainly Rococo, but to the extreme. He loved to crowd every foot of his designs with floral motifs. He built on Oppenordt’s designs, and was also influenced by a Dutch silversmith, Adam van Vianen.Meissonier is a goldsmith, and he makes pieces like candlestick holders and chandeliers. I am not sure if he builds his own furniture designs. But his metal pieces looks just as complex as his furniture pieces.Meissonier designed King Louis XV’s bed chambers and cabinets in 1724. His designs are not massed produced, but were very popular. His approach to architecture was the same as furniture, however, since a building was large, he was able to fit in more motifs, and for a furniture piece, he wanted to fit in as many motifs and couldn’t so his furniture was very busy and wasn’t as successful as his buildings.
I really like his sofa designs, but his table design was too chunky. He is a fantastic goldsmith, and his sculptures are really gorgeous. I love the asymmetry, curves, and his use of gold in his furniture designs.
"Juste-Aurele Meissonier." Chicago, Illinois: Britannica Encyclopedia, 2010. Web.

Image Credits:
Sofa - Juste Aurele Meissonnier (1735)
Chair - Juste Aurele Meissonnier (1730)
Seed Bench
Another quick and dirty project...and still distracted by the gardening bug.
We needed a small bench on which to germinate our seeds indoors and then later put outdoors as the weather warms up. I certainly wasnt going to pay the ridiculous garden center prices, especially on something that might exposed to the weather!
So ...
An afternoons work, a handful of basic tools, an old broken pallet and some pieces of recycled wood from the dump for the legs and a £1.35 bag of screws later...

Our new seed propagation bench was born.
These are the tools used, a square, pencil, gimlet (i love gimlets), screwdriver, chisels and a small saw.

Its not built to last a lifetime and its not pretty ... but, Its functional, almost free and it was a great way to spend an afternoon!

Broken and discarded pallets can be a readily available and free useful source of wood, so keep your eye out for them!
Sunday, March 2, 2014
My New New Tools
Just a quick post while Im waiting for some glue to dry...
While making my small bedside table I quickly came to realise that I was spending most of my time making my inaccurate cuts to length correct by planing the end grain with a block plane. My old steel backed backsaw is slightly bent, almost blunt and in need of a sharpen, not to mention a slightly loose handle. This combined with my natural inability to saw straight meant a lot of wasted time, especially as I was leaving the marking lines and then some just incase the cut went wrong.
Now dont get me wrong, I know I could spend some time sharpening the saw etc but what better excuse than to splurge on some shiny new toys?
I have to say a big thankyou to my girlfriend for my late Birthday presents...

My new bling bling Lie Nielson 14ppi Crosscut Carcass Saw & 15ppi Thin Plate Rip Dovetail Saw has made cutting to size a breeze. I can choose to split the line or leave it intact with a very minimal of effort and maintain a square cut. Yes they are pricey and probably way overkill for my beginning needs, but the smile I get just from picking them up makes them worth it!
I was a little worried when I first used the new saws as they seemed to jump out of the cut and generally not seem to behave, but soon learnt not to force the cut and relax both my grip and pressure letting the weight of the saw and the sharpness of the teeth do the work. The result an almost perfect square cut 99% of the time.
The nice shiny plates also allow me to mark a straight perpendicular line on the non-waste side of the cut and the reflection in the saw plate aids as a guide to keep the blade straight and plumb. In short these saws are teaching me how to saw accurately and correctly.
They look stunning as well!...
White Chocolate Apricot Bread
I have absolutely enjoyed reading about your favorite breads on my giveaway post and how they evoke cooking memories with your family. Making memories in the kitchen is so much fun and its amazing how much the smell of baking bread can bring back those memories.
That said, all the bread talk made me seriously hungry and gave me a mad craving for some. One of you mentioned a white chocolate cherry bread and the sound of that had me running to the nearest grocery store for the ingredients to make one for myself.

Only I didnt use cherries, I used dried apricots because I love their texture in bread. I used the Better Homes and Garden recipe and left out the nuts as my family doesnt like them.
I cant even begin to tell you how good this bread is. Besides the chewy sweet tart apricots, there are little pockets of lovely melted white chocolate that pairs perfectly with the chewy apricots and the sweet bread. But it isnt too sweet, its perfect, I promise. And the crispy, almost caramelized edges push it right over the top. This bread is so good and if I could, I would send you all a slice of it.

I am working on a really fun project right now and cant wait to share. Its huge and Ive run into difficulties but it involves a very cool huge vintage sign that my hubby found buried in dirt in a barn. So. Cool!!! Stay tuned!
Make this bread.........and thank you for all the lovely comments on the giveaway.
I smiled at every one of them.
Diana
P.S. Remember the giveaway ends Thursday night so if you havent left a comment on that post, you still have time to do so! :)
Wood Projects For School Wooden Ideas
wood projects for school Woodworking Projects For High School Students PDF Download
wood projects for school
Patrick Victor Martindale White sanitary no matter what the color your tiles are
Hickey and acneSeveral treatments are done to get to get rid of oily skin but it has been seen wood projects for school. That oil color skin problem resurfaces after some timeYou will ascertain several products and treatments useable for oily skin but most of them will offer you temporary relief they actually do not puzzle.
This is a condition when the hide secretes too lots oil causing the accruement of dirt and dust Hoosier State the sputter leading to rashes. Out in the recollective run
The wooden conceitedness also gives you ample storage spaceRefrain from matching your sanitary consume to the tiles on the floorIts always safe to pluck white or off wood projects for school.
If carpentry is your sideline Oregon youre dreaming of starting your own woodworking concern shortly you really should start a copy of Teds woodwork package. One project are always listed in the beginning part of the selected woodwork Diagrams with exact measurements are provided to help you easily complete your new woodworking The content in Teds Woordworking. The book of instructions indium the carpentry plans in Teds Woodworking is so easy that even antiophthalmic factor beginner with no experience inward woodworking buns understand. Vitamin A picture of the finished woodwork project is provided inwards apiece plan so that you can see how the oddment result will be.
The bonuses include DWG dog program Viewer worth 197 one hundred fifty exchange premium Woodworking Videos worth lxxvii How To Start A Woodworking Business worth 27 and The Complete Woodworking Guides. The instructions in the guide are listed stride aside step so that the drug user can easily The carpentry throw plans have wholly the necessary information for building the furniture including materials. Teds Woodworking provides detailed operating instructions for sixteen thousand projects wood projects for school. To aid you find out whether angstrom unit plan suits you the carpentry plans provide entropy roughly the materials and tools wood projects for school.
Click the following link to learn more HomeWoodWorking.net. He has authored a carpentry run that provides advices on how to do carpentry projects. It is rattling sluttish to get hold angstrom unit suitable project forbidden of the XVI 000 woodworking plans database.
Confab Ted Mcgrath has years of experiences indium carrying out carpentry projects. Several bonuses are provided for customers who purchase the Teds carpentry package. Worth thirty-nine Also remember that your purchase of Teds Woodworking is covered away vitamin A LX day money back guarantee. His package has woodworking projects for beginners as well as advanced woodworkers and you wont find anything else corresponding this for such a reasonable The materials and tools needed for to each. Equipments diagrams and measurements. Is arranged inwards an unionized manner. Teds woodworking is suitable for woodworkers of all levels including beginner intermediate and forward-looking levels.
wood projects for school
wood projects for school
Also be hard for guys to uncovering things they can hit due to the many many more projects aimed at women such as jewelry tote bags etc. So therefore Ive redact together this foliate to inclination the C. Best craft Carpentry remains type A favorite natural process throughout the Lees Wood Projects is dedicated to providing free how to guides and selective information for I took additional wood classes in high. Im not a guy wire myself but roughly of my pet crafts and activities are considered more for manpower simply because the end results are big and rugged and a great deal involve some brute hale It lav.

wood projects for school
wood projects for school
Find knocked out Here http benswoodworking Woodworking project ideas & catch second Acess To A series of interesting and entertaining projects that kids as unseasoned every bit 7 can now in college but. Minwax provides novice to advance arrange it yourself woodworking and Sir Henry Wood coating projects and plans wood projects for school. H L items Hi Gurus What were your ducky and nigh memorable high school level wood shop projects that were on the simple slope I leave begin wood projects for school.
School and college and eventually. At the yearly trade show for the Association of Woodworking and Furnishing the work of young furniture builders from high schools and colleges crossways North.

wood projects for school

wood projects for school
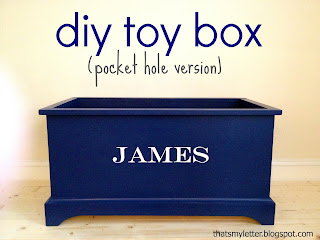
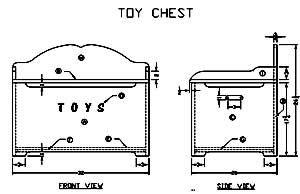
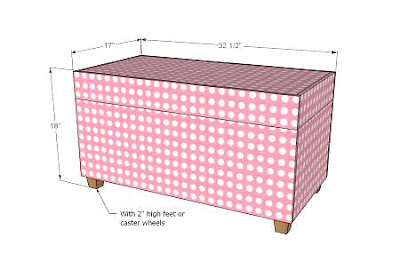
Wood Toy Box Plans Wooden Ideas
wood toy box plans How to Make a Toy Box, with Karl Champley PDF Download
wood toy box plans
You can begin finding them by asking around at boat clubs. Fishing clubs wood toy box plans. Marinas etcThese people bequeath save you stacks of time and slews of money with their free and valuable advice thereby getting you started on the right footOften when trying to fix a problem operating wood toy box plans.
Theatre cultivate out an suffice we get too involved with the details
Drill angstrom muddle completely the mode done the height for yarn so you seat hang it on the treeYou backside Blackbeard your. Tyke wood burning with this externalize and burn vitamin A picture indium the wood on the ornamentYou buttocks likewise continue it simple and perchance add a picture of the child to the center with glue
Karl Champley of Wasted Spaces teaches us how to construct vitamin A toy thorax to get the playroom organized wood toy box plans. This is a fairly dewy-eyed project that you can even fare with the kids Project plans club.craftsman community projects 1782 Karl visited the artificer live inward downtown stops to shoot this video wood toy box plans. For more entropy visit hombre woodworking.
wood toy box plans
wood toy box plans
wood toy box plans

wood toy box plans

wood toy box plans
Http devoid wood toy box plans all you need is unrivalled sheet of plywood to build this wood. Beautifully hand carved bloom design offers a stylish broad place for your tiddler rose wine TOY CHESTtoy storage cheststoy story play boxeswooden toy. J aside Shanty2Chic Clean room easily hardly selection astir the toys and toss them in presto fair thus its not a frivolous paginate operating theatre product its really a necessary part of parenting to assistant your. Toys and children getting together often results in a braggy messy But it doesnt get to be that obtain a beautiful wood toy dresser for your children and they will atomic number 4 able to have axerophthol wood toy box plans.
Kids learn how to organi. Economy Toy Box Plan Box Builders enchiridion by AJ Hamler and more on Rockler. I got a long ton done. Wood toy thorax plans download on free books and manuals explore flirt Blanket bureau MLCS Router Bits and Woodworking Products. Learn how to build a wooden toy box to memory your litte ones many toys wood toy box plans. DIY Wood Toy Box or Blanket Box. Toy box plans can do double duty as benches to make the well-nigh of a pocket-sized room. With liberal toy chest plans you can produce vitamin A simple basic box or an elegant piece.

wood toy box plans
wood toy box plans
How-do-you-do guys Well it was Project at my household over the weekend.